
A blueprint is a reusable training plan. You write it once, with loads in % of 1RM instead of kilos or pounds, and split it into blocks (for example Accumulation, Intensification, Peak). When you're ready, you apply it to one or more athletes: each block becomes its own program for each athlete, with weights worked out from that athlete's maxes.
This guide covers the main screens and the everyday tasks. You don't need to learn everything at once; most coaches start with the Overview and the Matrix.
Find your blueprints
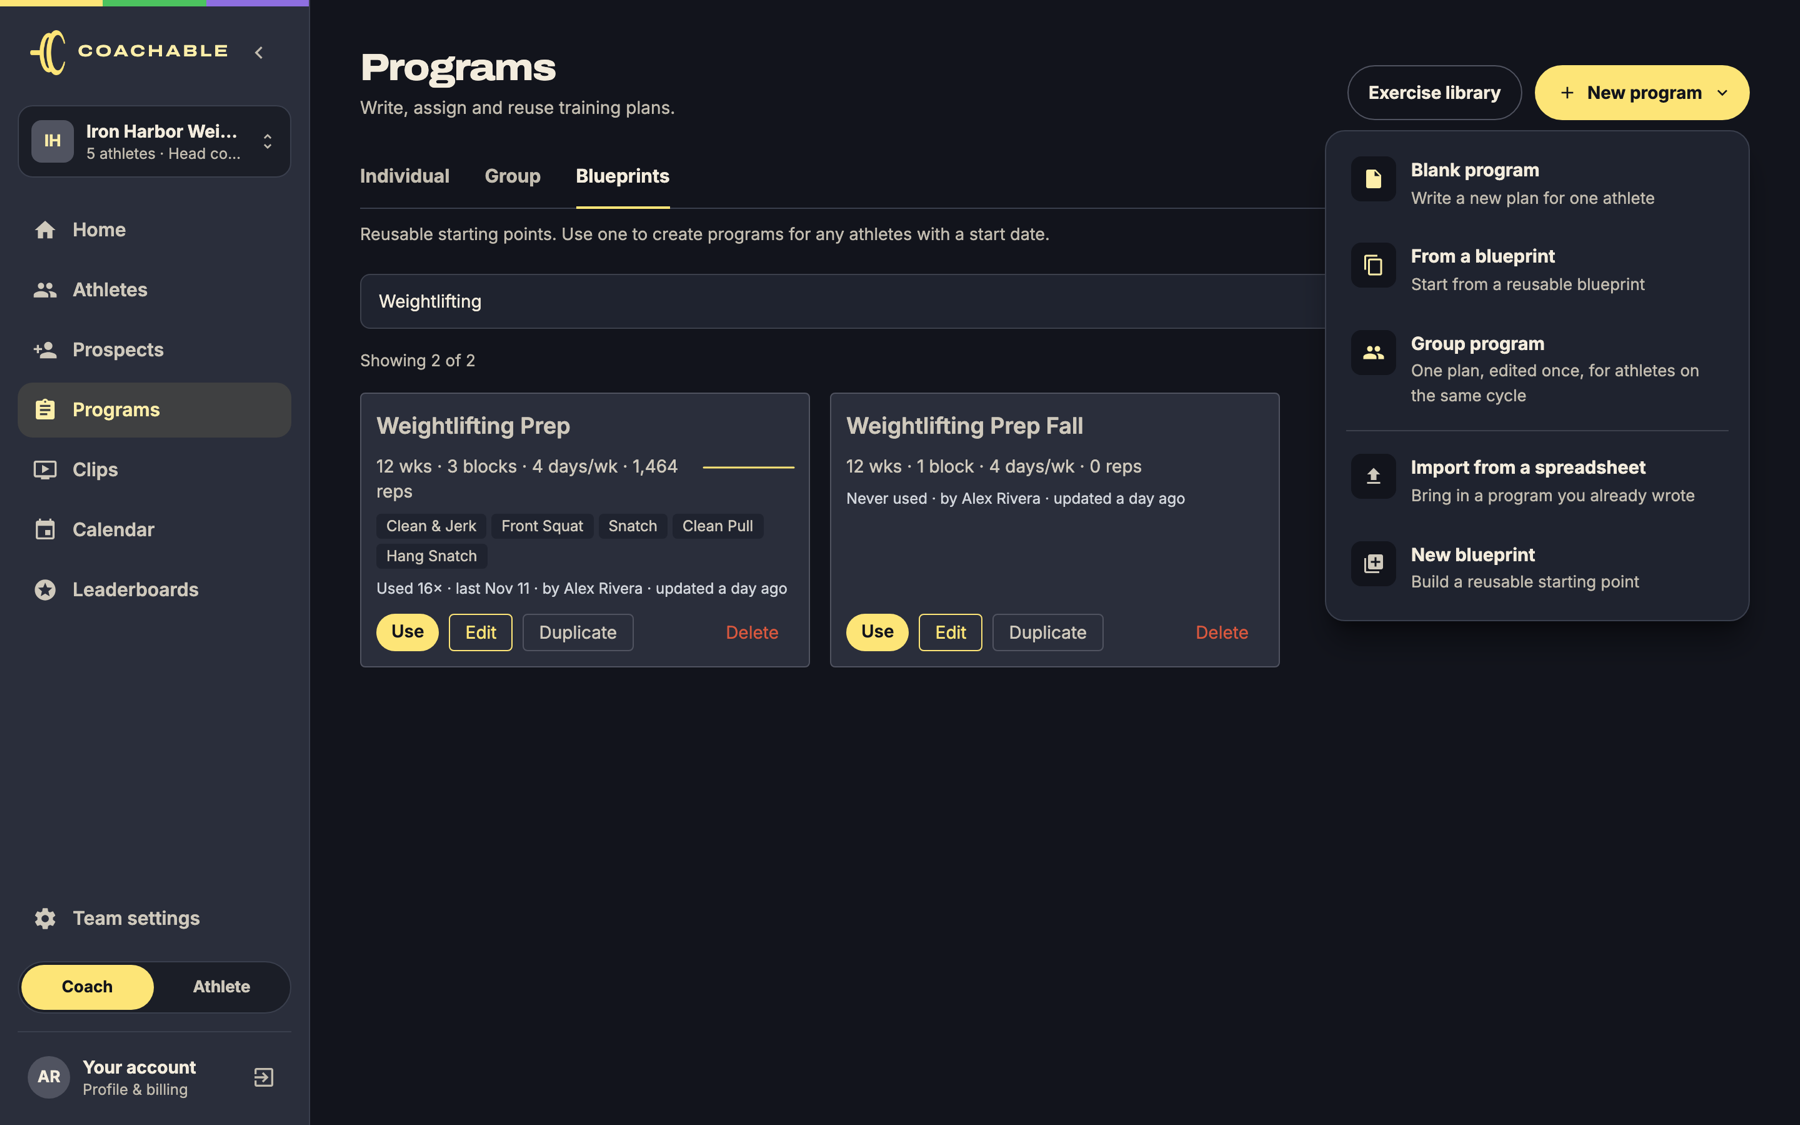
Open Programs from the sidebar and choose the Blueprints tab. Each card shows how long the blueprint is, its main lifts and how many times it's been used.
- Use applies the blueprint to athletes.
- Edit opens it.
- Duplicate makes a copy you can change without touching the original.
To start a new one, click New program and pick New blueprint.
Create a blueprint
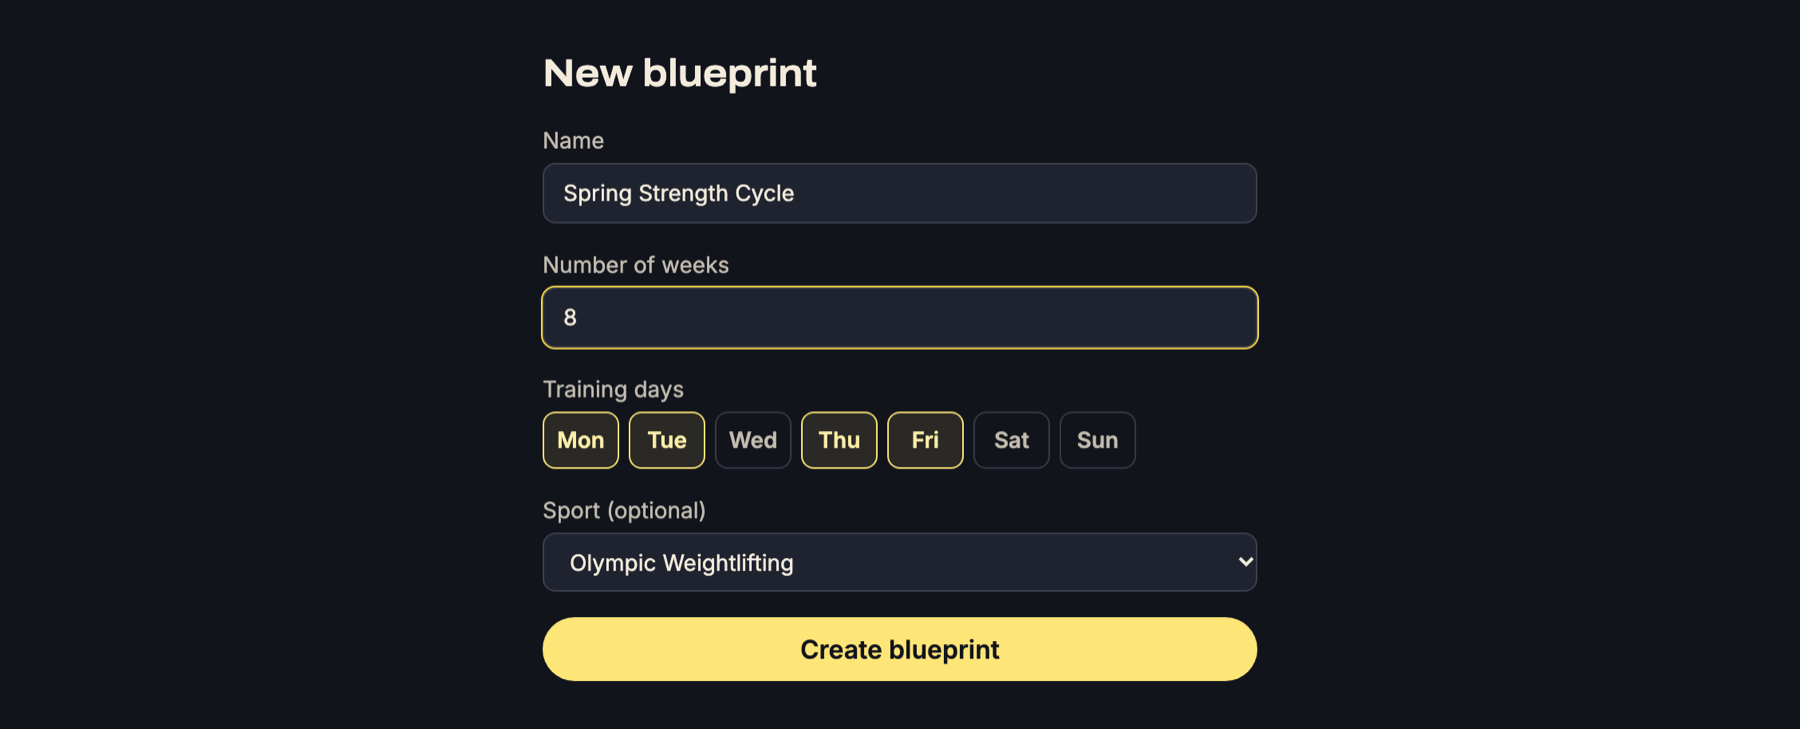
Give it a name, choose how many weeks it runs, and tap the days of the week you train. Sport is optional. Click Create blueprint and it opens straight away.
Tip: Don't worry about getting the length perfect. You can add weeks and blocks later.
Everything you change in a blueprint saves automatically. You'll see "Saved" next to the buttons at the top.
The four tabs
Every blueprint has four tabs along the top:
| Tab | What it's for |
|---|---|
| Overview | The big picture: blocks, weeks, planned volume and who's on the plan. |
| Matrix | A spreadsheet of exercises × weeks. The quickest way to write the plan. |
| Calendar | The familiar program editor, day by day. |
| Athletes | How everyone who's been given this blueprint is getting on. |
The Blueprint · Program · Day switch in the top right zooms between the whole plan, one block, and one day.
Overview: shape the cycle
The Overview is a timeline of your whole blueprint.
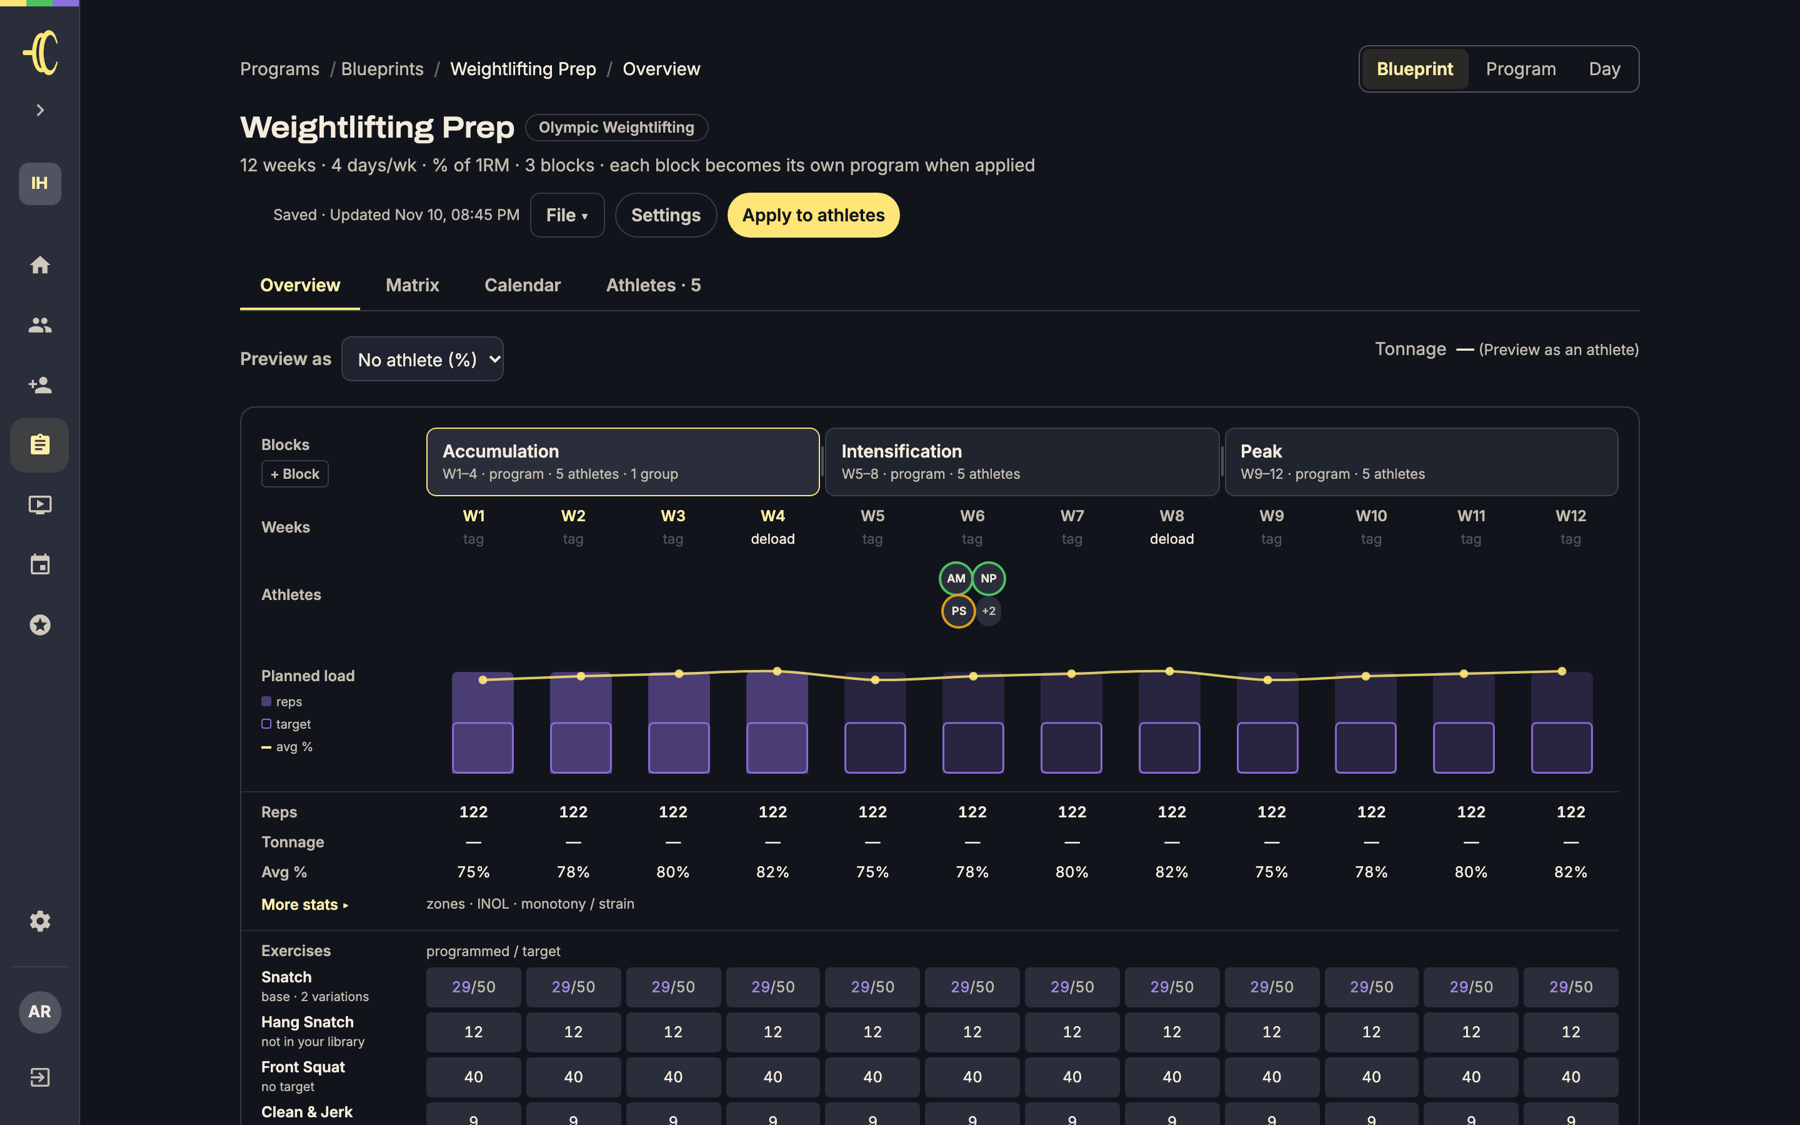
- Blocks sit across the top. Click a block to select it. Click + Block to add one at the end, or drag the small handle between two blocks to move weeks from one to the other.
- Weeks can be tagged. Click the grey "tag" under any week and type something like deload or test.
- Athletes shows who is currently on each week (more on this below).
- Planned load charts reps per week against your targets, with the average intensity as a line.
- Exercises lists each lift's reps per week as programmed / target.
Below the timeline is the selected block. Here you can rename the block, write a short goal for it, see its totals, and split it in two.
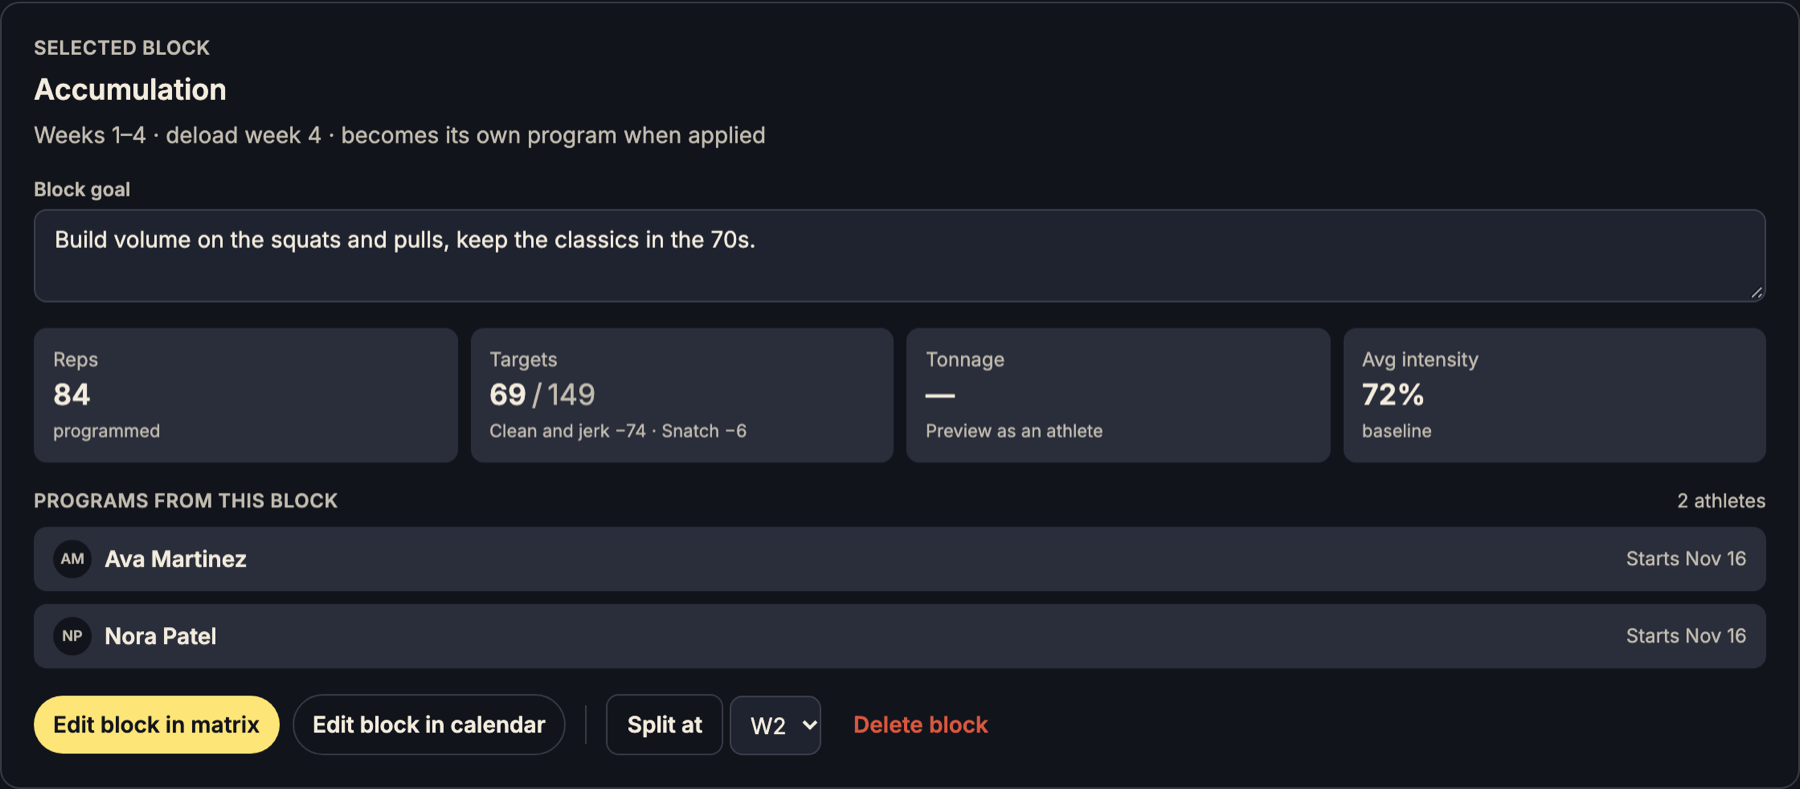
To split a block, pick the week the new block should start in and click Split at. Delete block removes the block and its weeks.
Matrix: write the plan fast
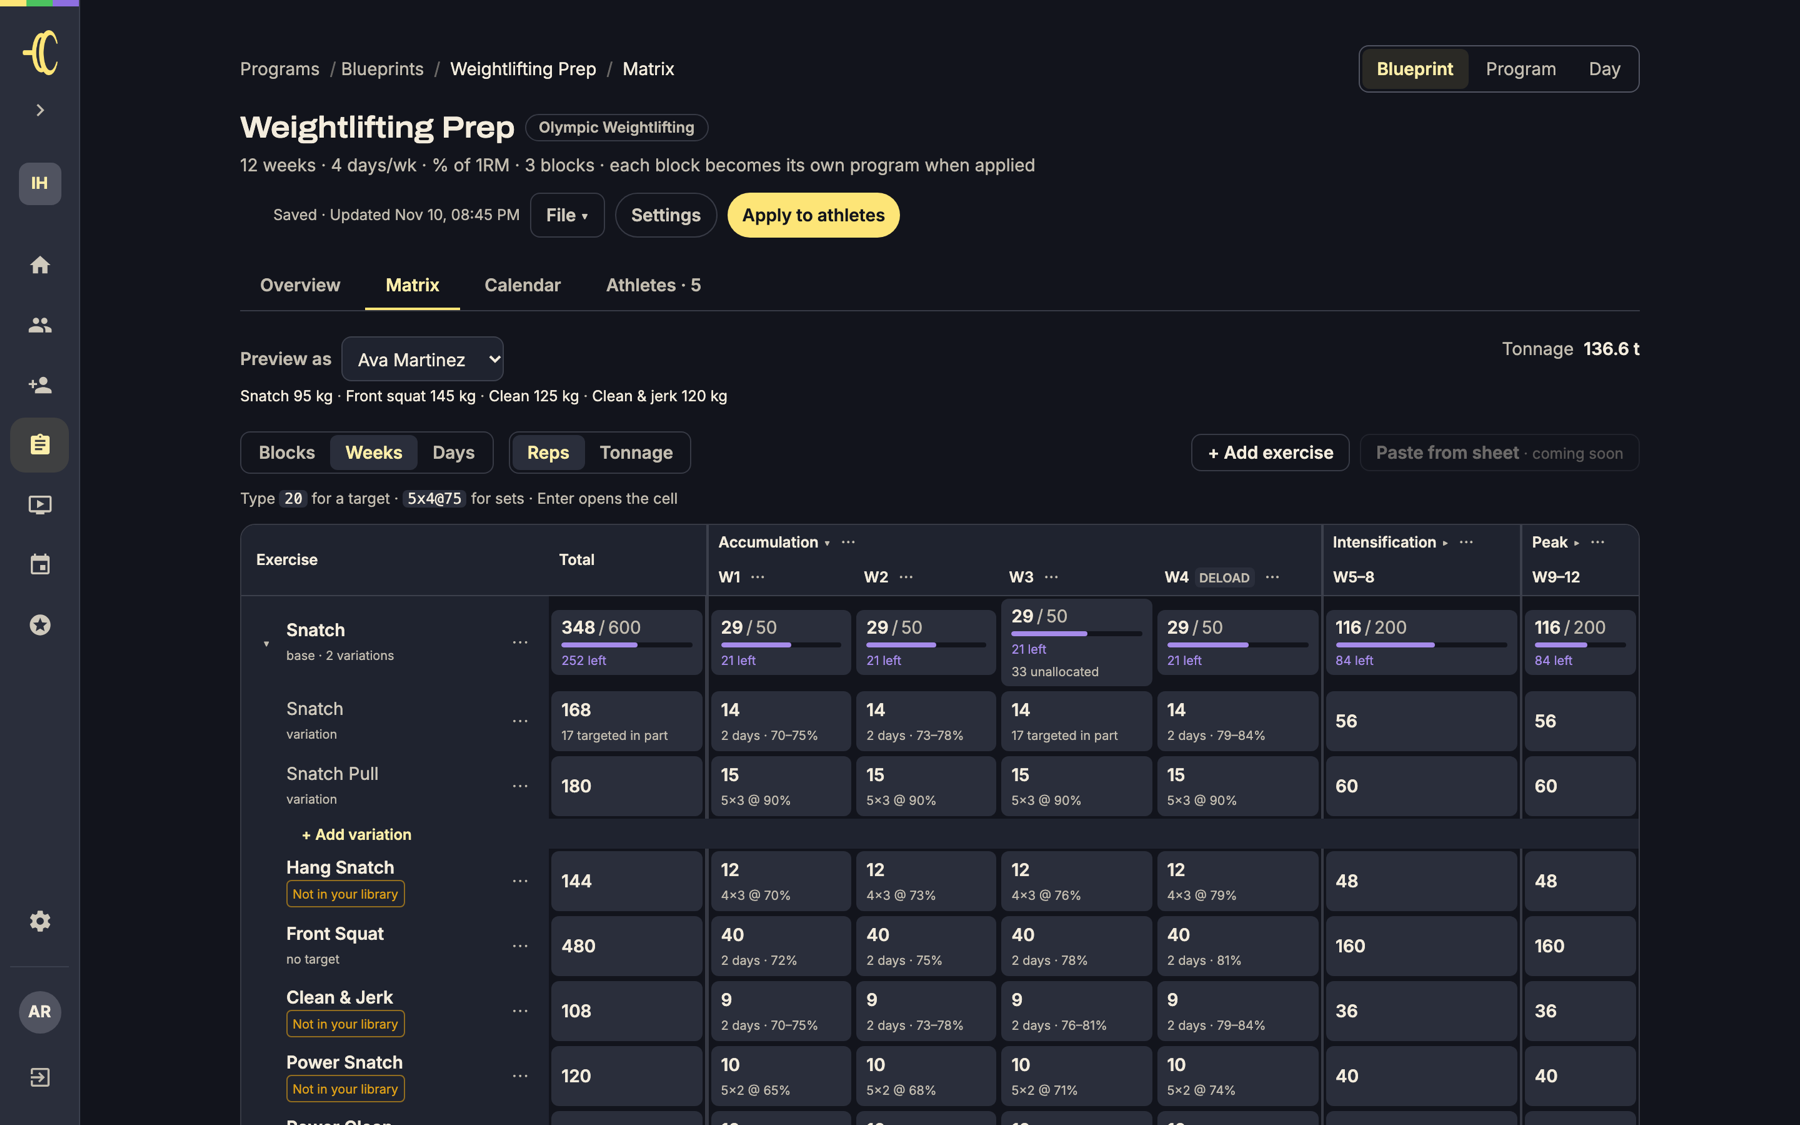
The Matrix shows every exercise as a row and every week as a column. Each cell shows the reps you've programmed, and if you've set a target, how close you are to it (for example 29 / 50 with a bar).
Add an exercise
Click + Add exercise and search your exercise library.
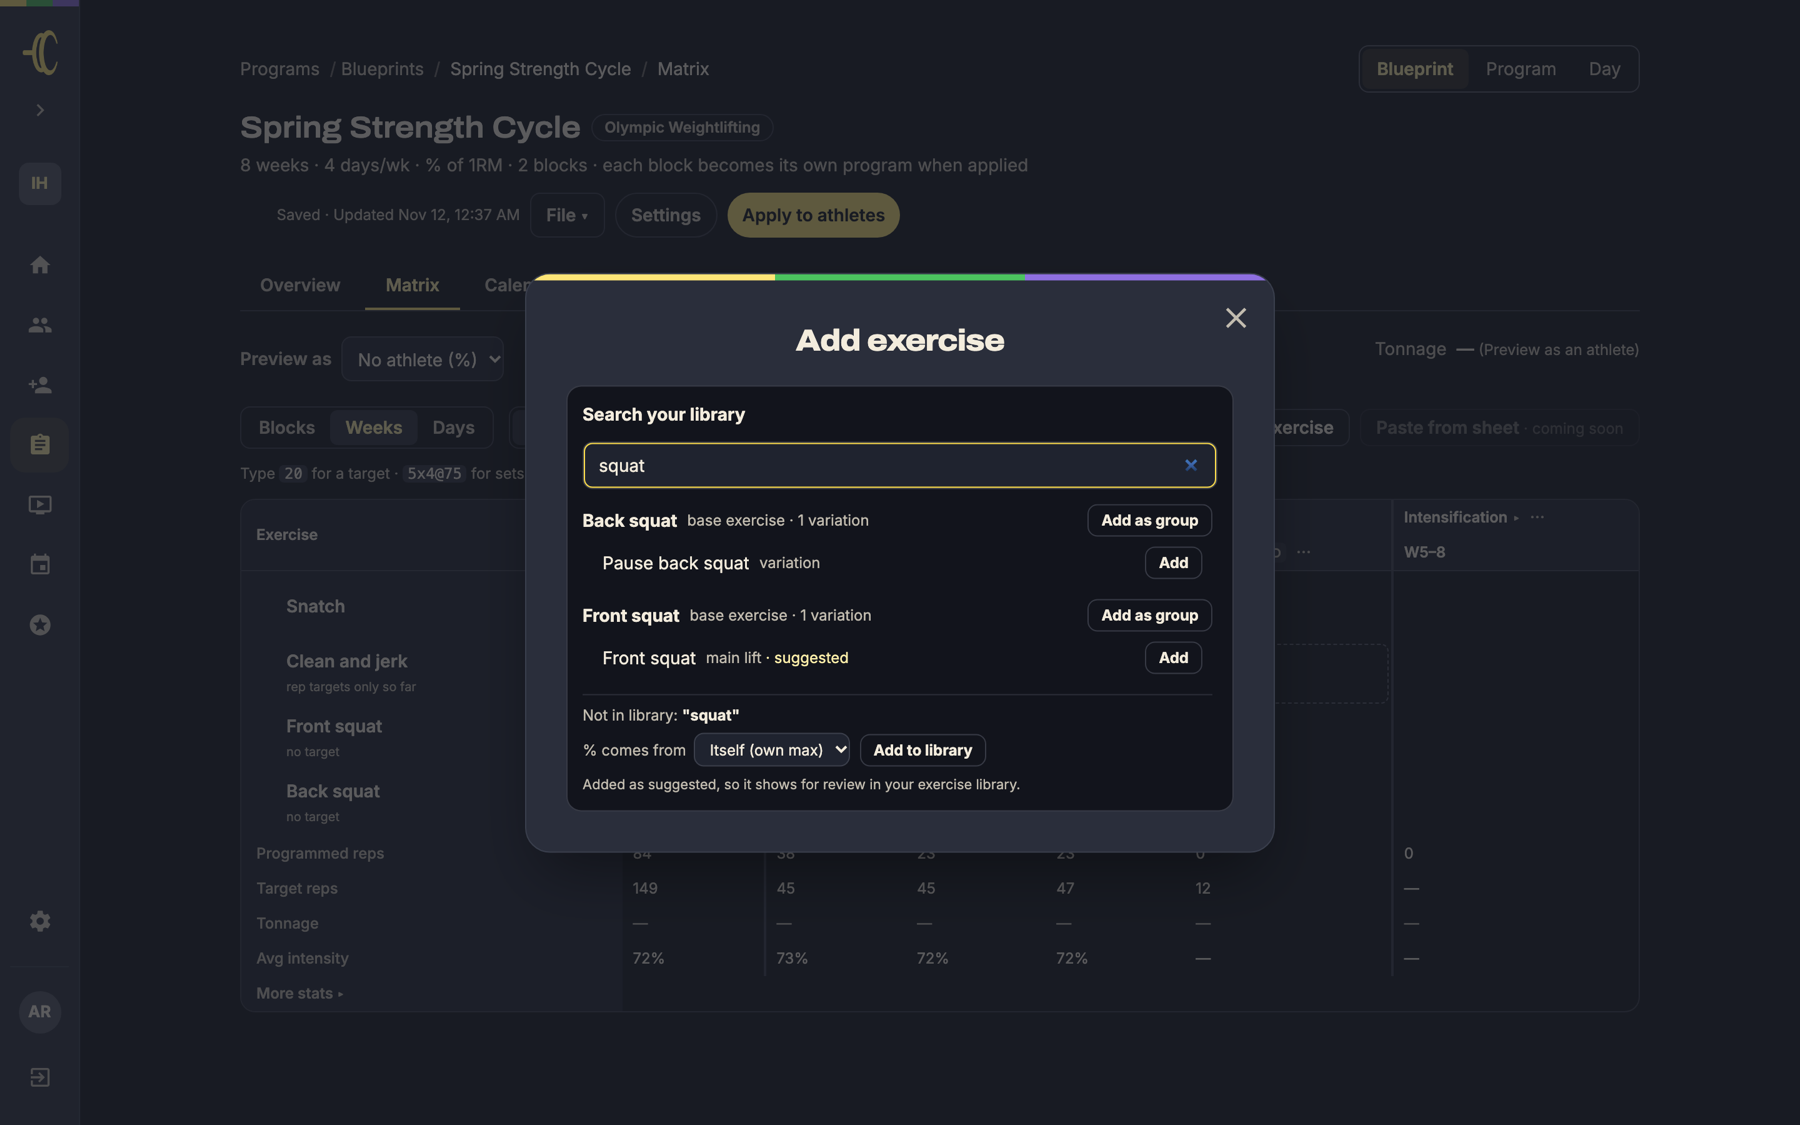
- Add puts that exact exercise in the blueprint.
- Add as group adds a base lift (like Back squat) that counts reps from all its variations together, which is handy for setting one target for "all squats".
- If the exercise isn't in your library yet, you can add it from the same box.
Fill in cells
Click a cell and just start typing:
- Type a number, like
20, to set a rep target for that week. A dashed cell means "target only": you've said how many reps you want, but haven't written the sets yet. - Type sets, like
5x3@75, to program sets (5 sets of 3 at 75%). You'll be asked which day they go on. - Press Tab to move to the next week, or use the arrow keys.
Use Blocks · Weeks · Days to zoom the columns out or in, and Reps · Tonnage to switch what the cells count.
The cell drawer
Press Enter on a cell, or double-click it, to open the drawer for that exercise and week.
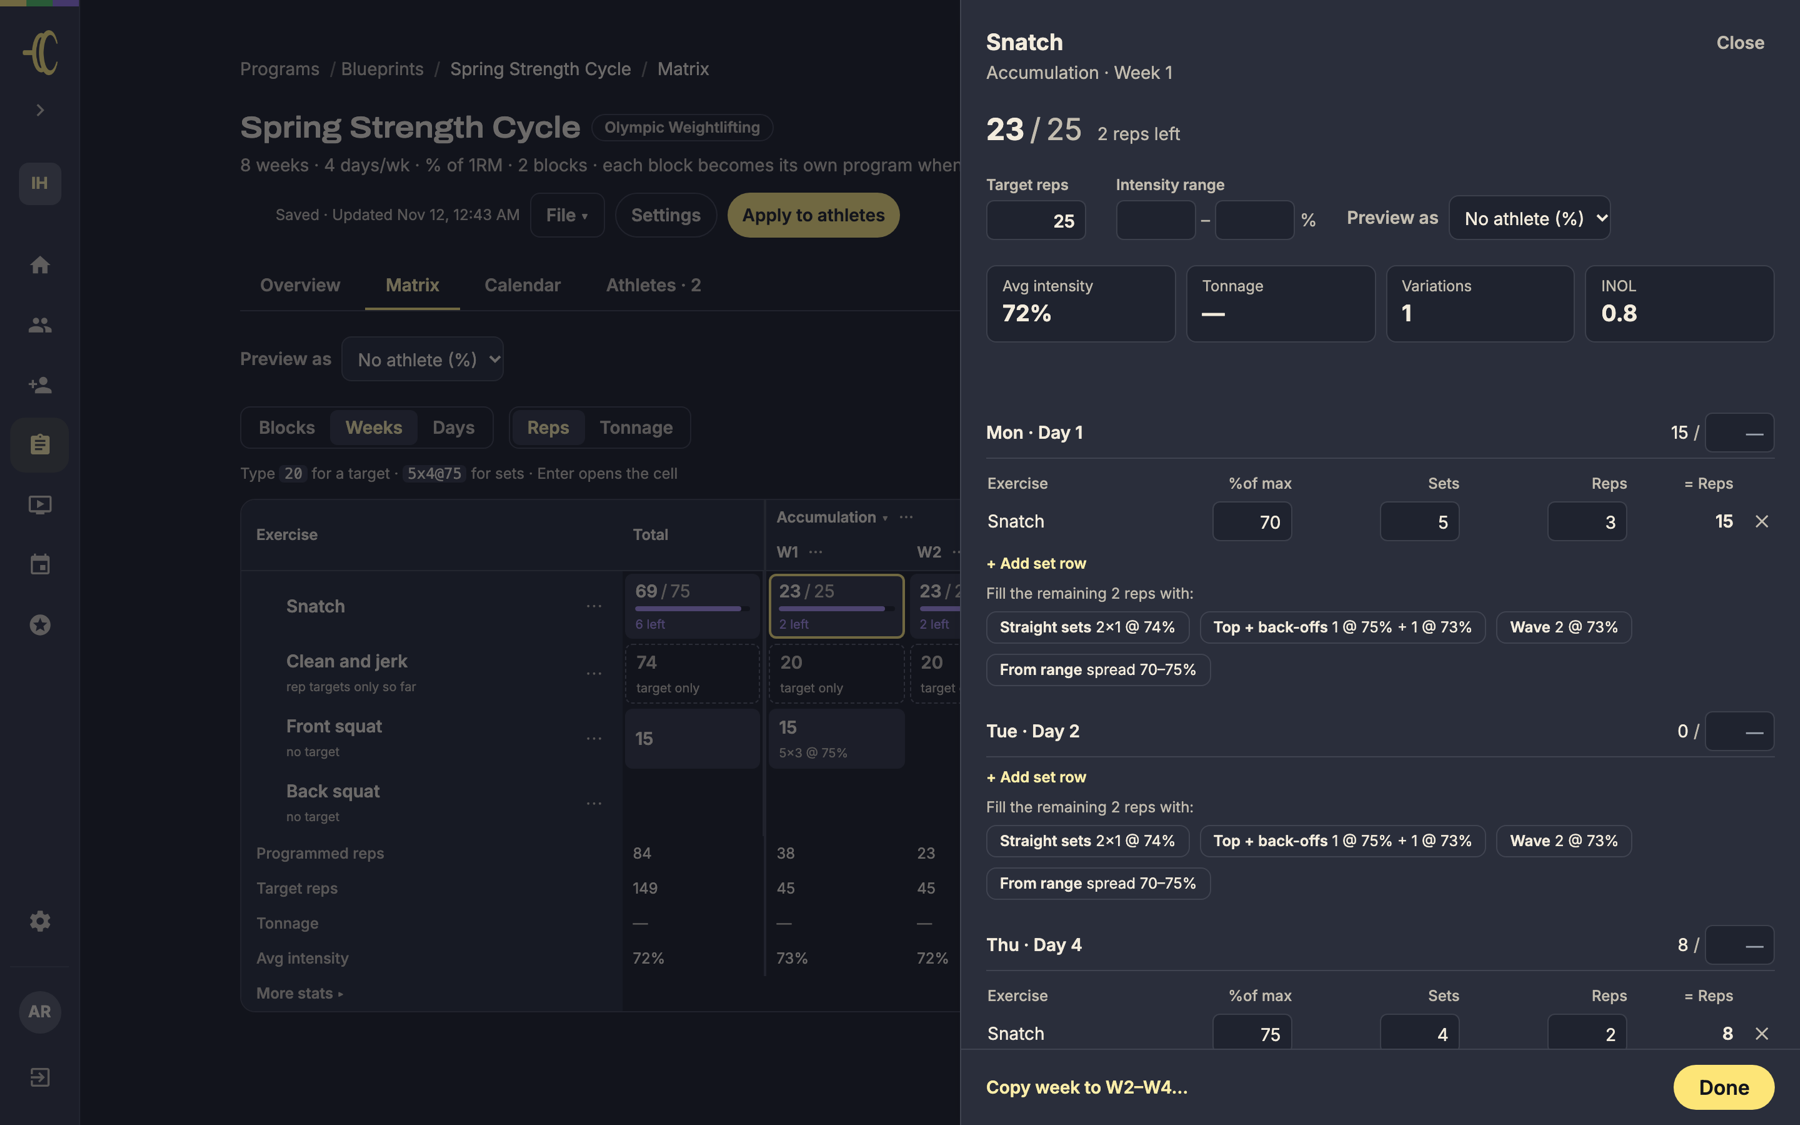
In the drawer you can:
- Set the target reps and an optional intensity range.
- + Add set row on any day, then fill in % of max, sets and reps.
- Use a Fill the remaining reps with shortcut (straight sets, top set + back-offs, wave) to hit your target in one click.
- Click Copy week to… to copy this week's work for this exercise to other weeks in the block.
Click Done when you're finished.
Calendar: fine-tune each day
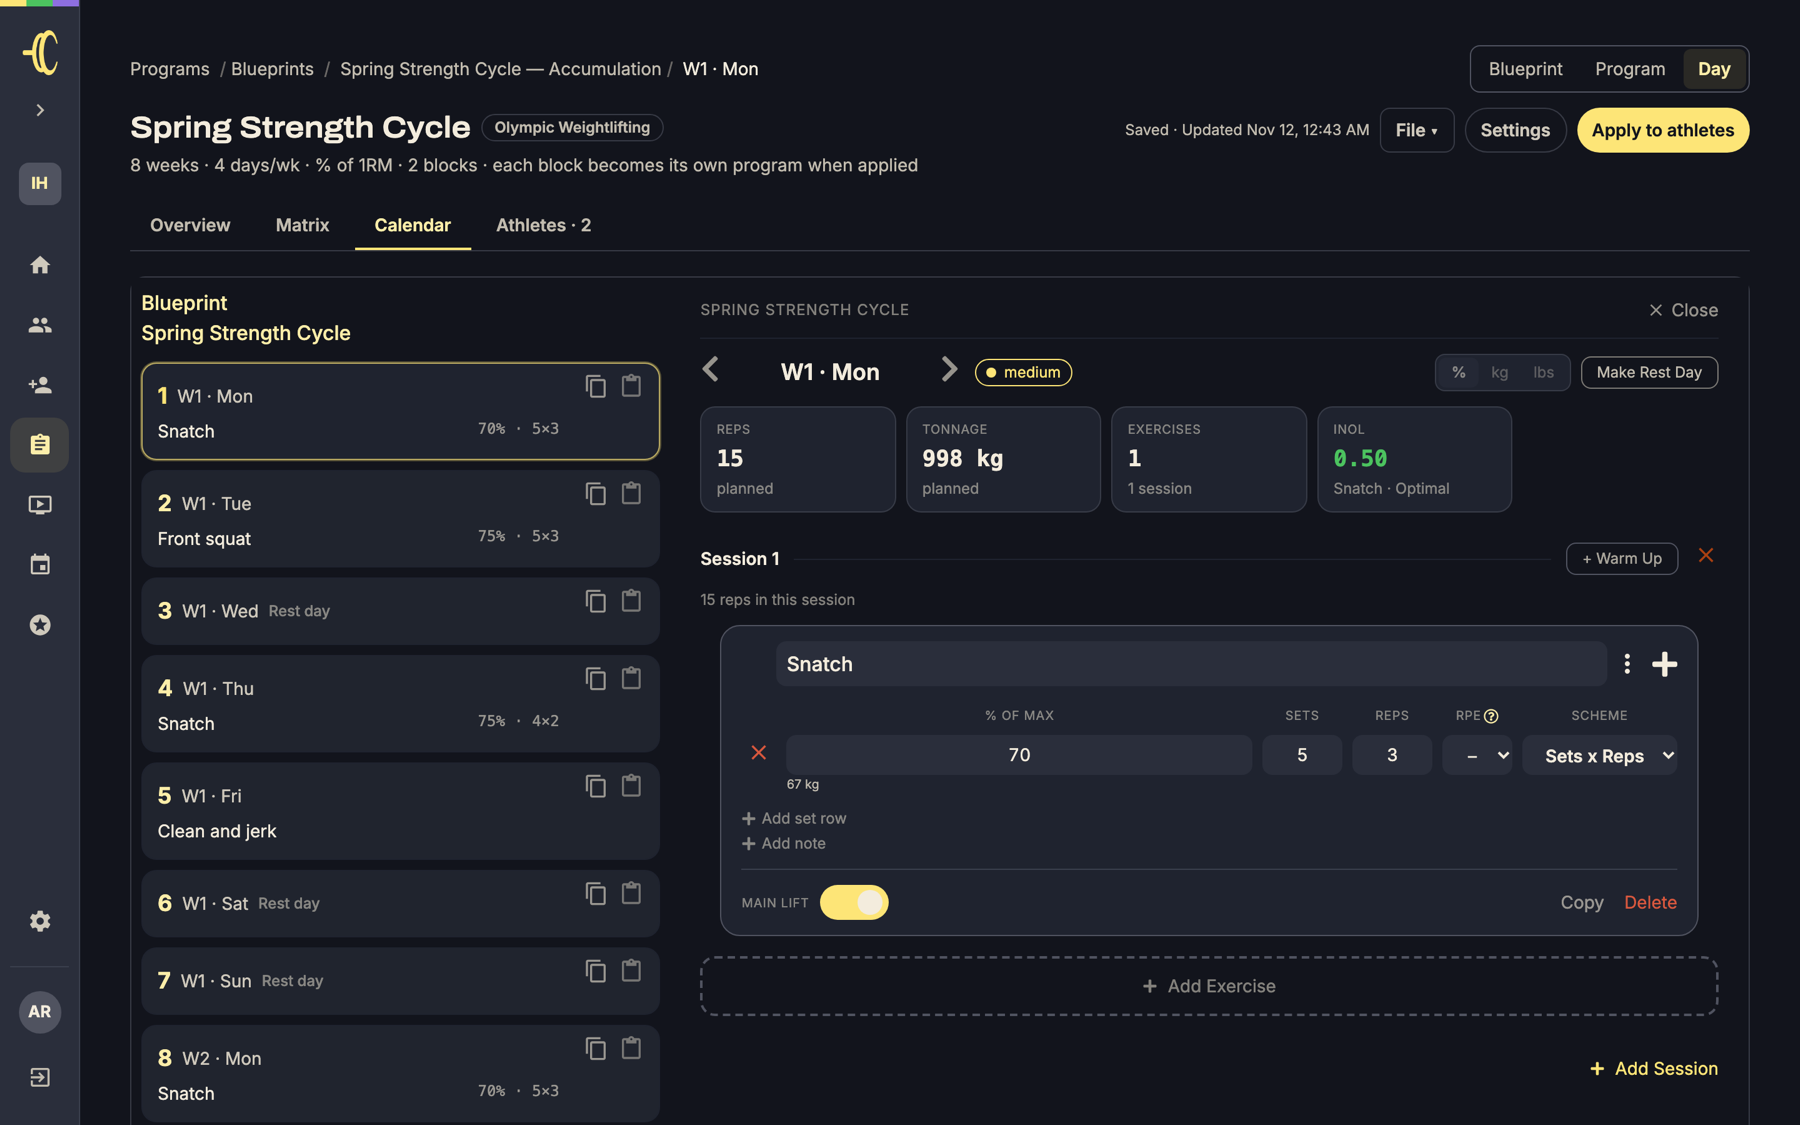
The Calendar is the same day-by-day editor you use for programs, so everything you already know works here. Pick a block at the top (or All) to choose which weeks you see.
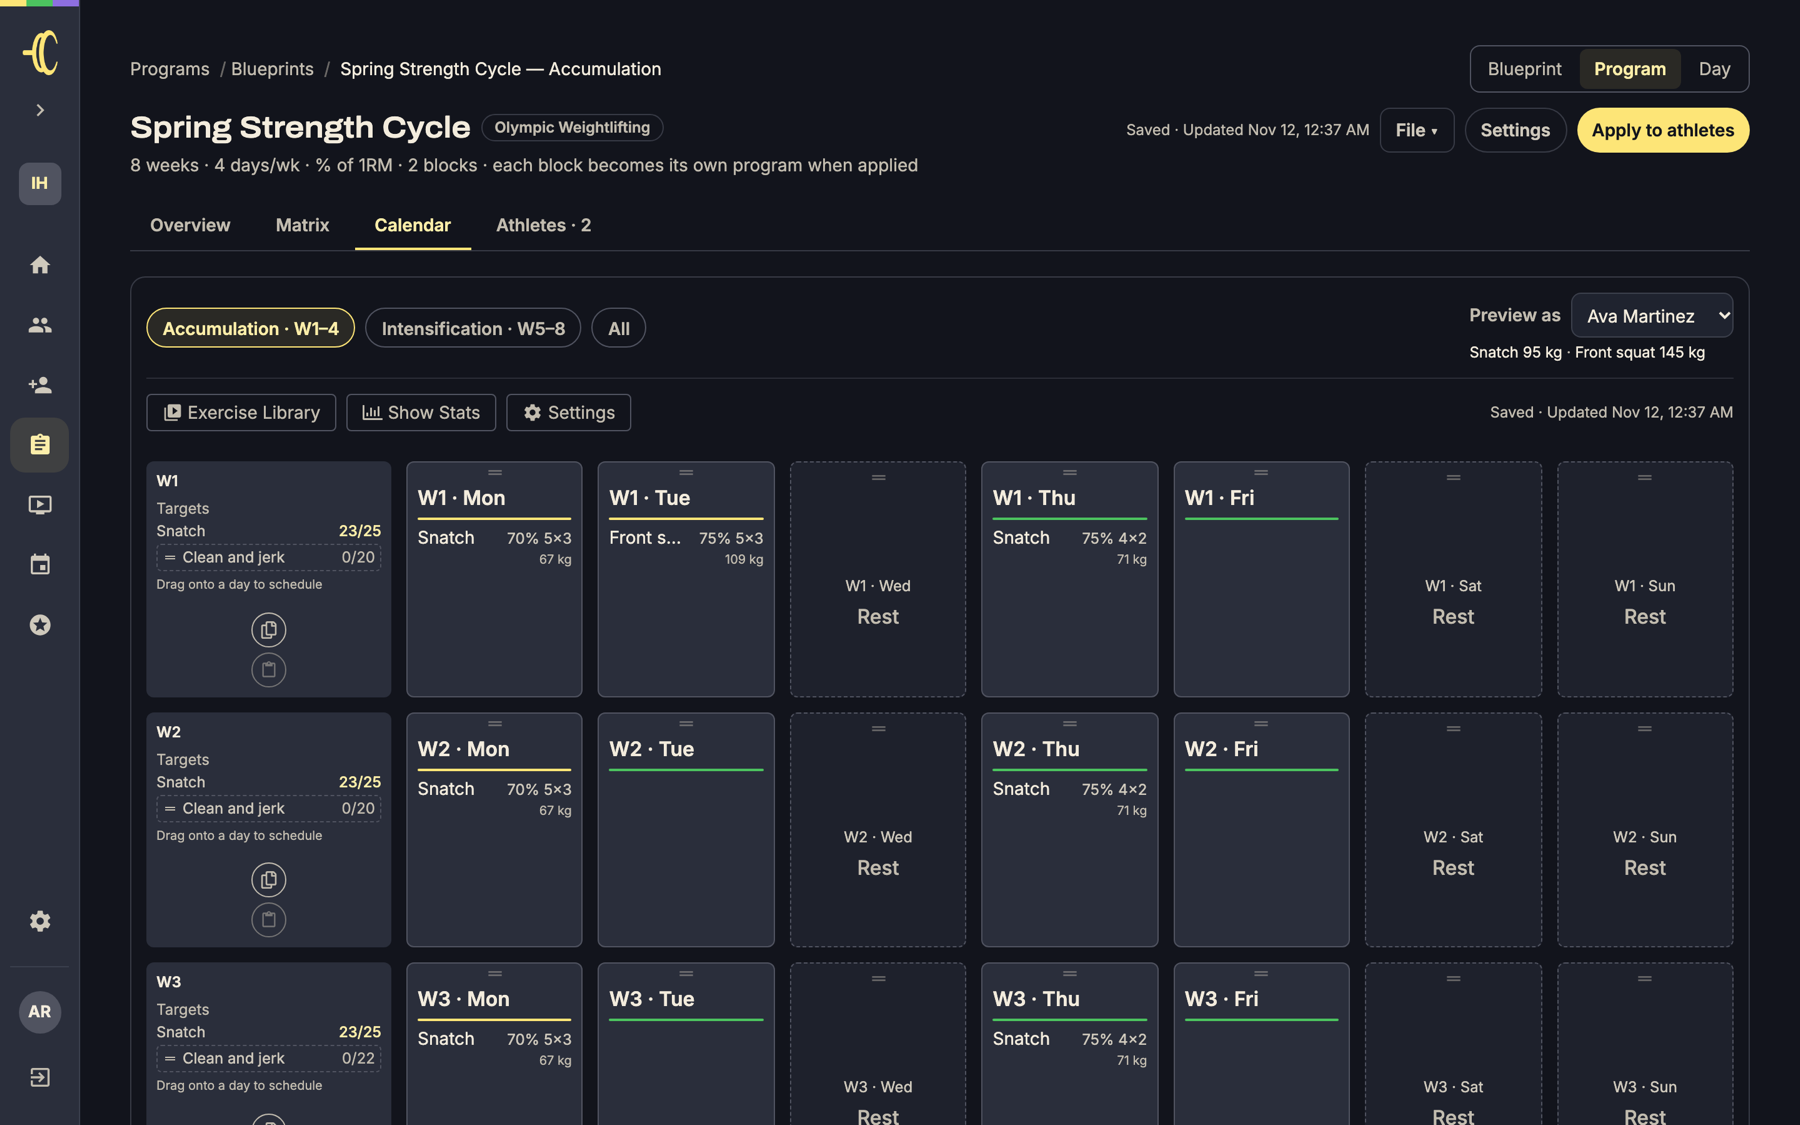
On the left of each week you'll see that week's targets. Any target you haven't scheduled yet can be dragged onto a day, which adds the exercise there for you to fill in.
Click any day to open it and edit sessions, exercises and sets in detail.
Preview as an athlete
Because blueprints are written in percentages, totals like tonnage are blank until you choose someone to preview them against. Use the Preview as menu (on the Overview, Matrix and Calendar) and pick an athlete. Coachable then shows real weights and tonnage based on that athlete's maxes, and lists the maxes it used.
Previewing never changes the blueprint. Choose No athlete (%) to go back.
Apply to athletes
When the plan's ready, click Apply to athletes (or Use on the blueprint's card).
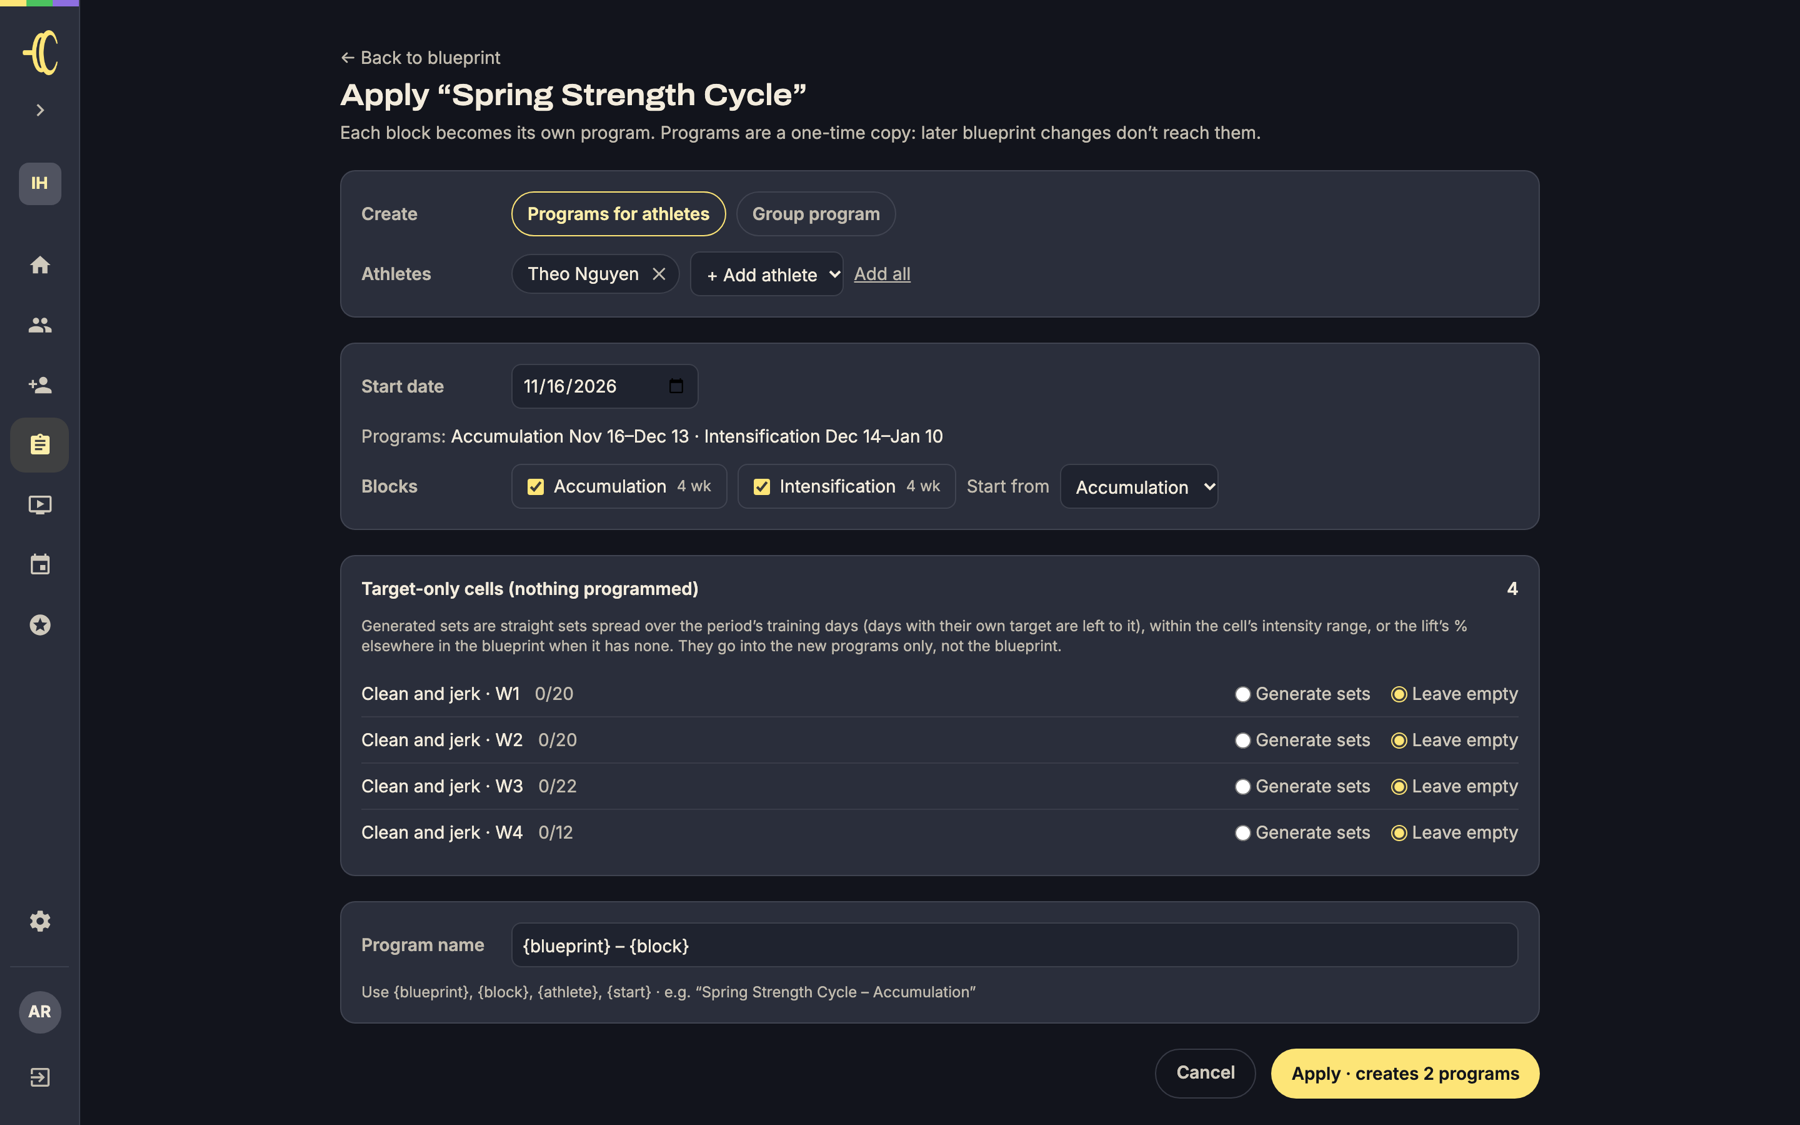
- Choose Programs for athletes (each athlete gets their own copy with their own weights) or Group program (one shared program per block, with loads left as %; you add athletes to it afterwards).
- Add athletes, or click Add all.
- Pick a start date. You'll see exactly when each block's program starts and ends.
- Untick any blocks you don't want, or use Start from to begin partway through (for example, straight into Intensification).
- If any cells only have a target and no sets, choose Generate sets or Leave empty for each one.
- Adjust the program name if you like, then click Apply.
Coachable lists the programs it created, with a link to each one.
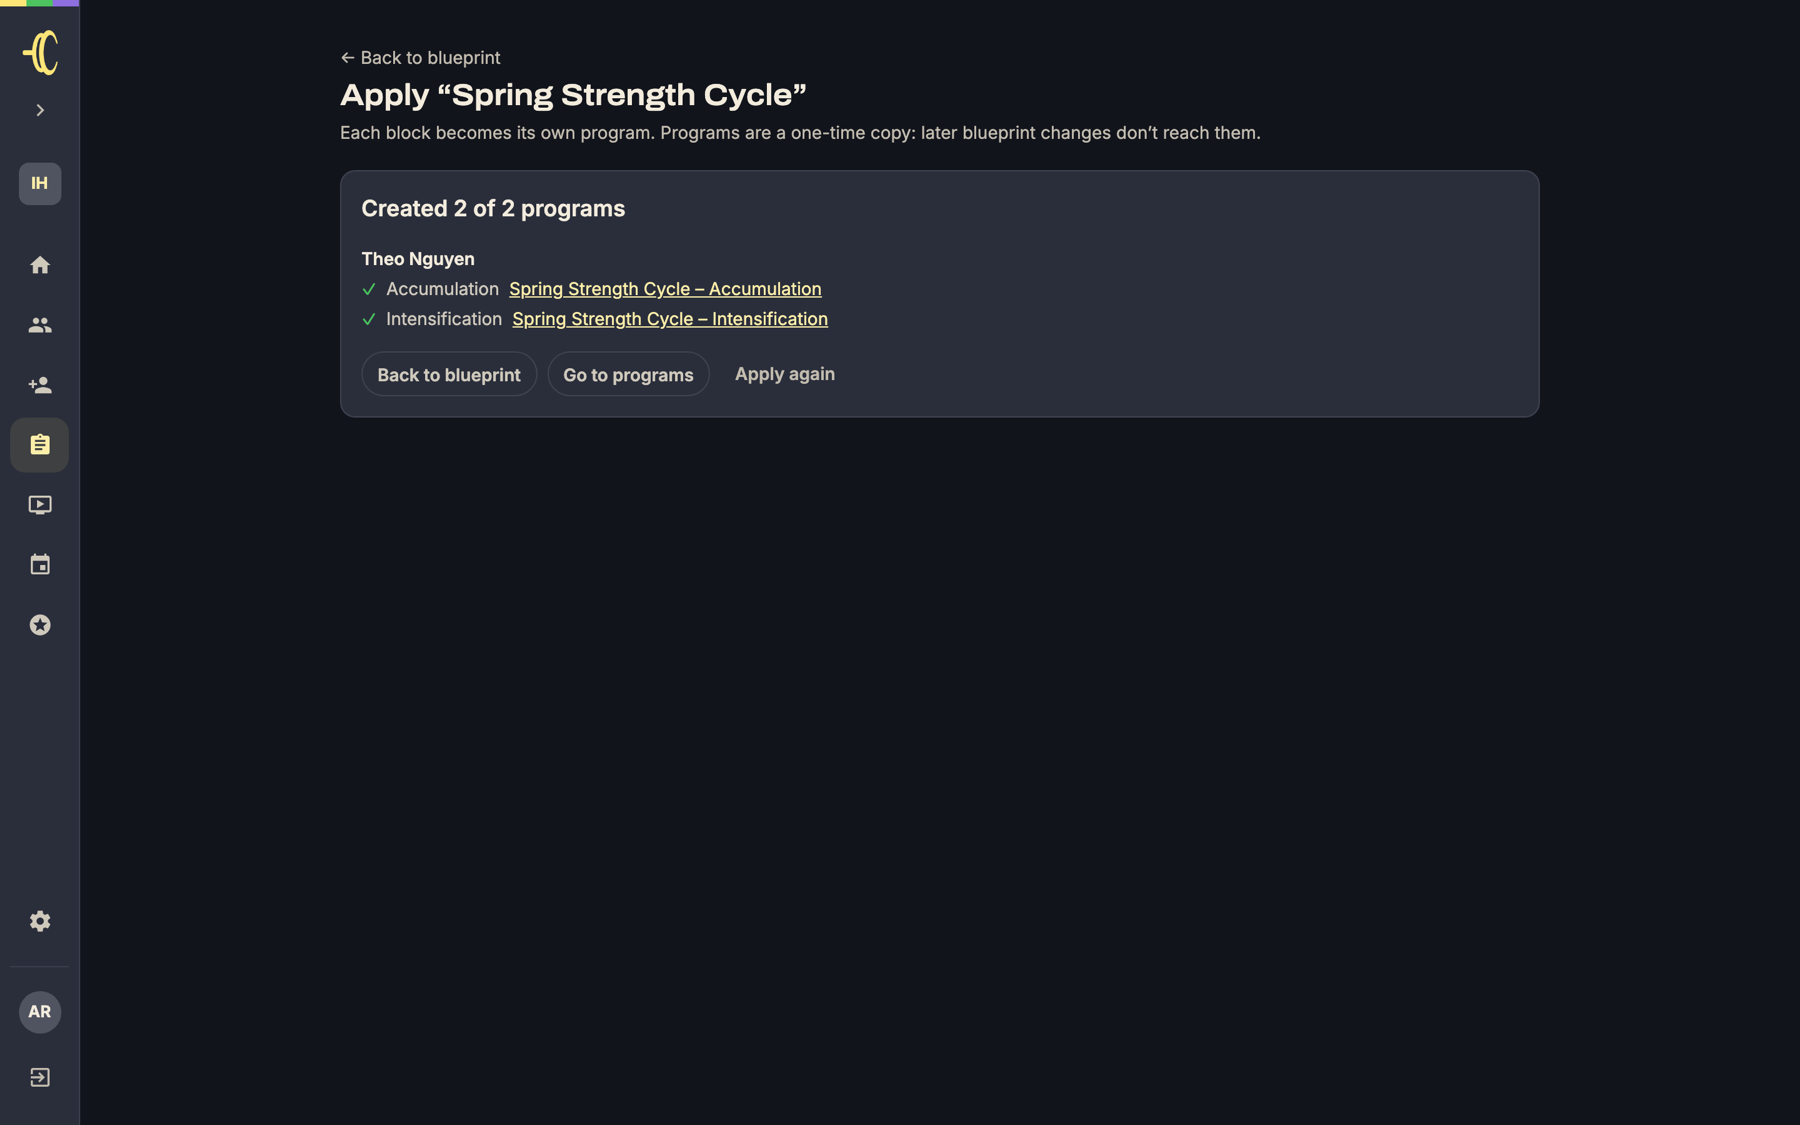
Good to know: Applying makes a one-time copy. Editing the blueprint afterwards won't change programs you've already created, and editing an athlete's program won't change the blueprint.
If an athlete is missing a max for a lift, you'll get a warning. Their program is still created, but those loads stay as a percentage until you add the max.
Follow your athletes
The Athletes tab shows everyone who has a program from this blueprint: which block and week they're on, how much of each block they've completed, their compliance (logged vs planned reps) and when they last logged. Click Open to jump to any athlete's program.
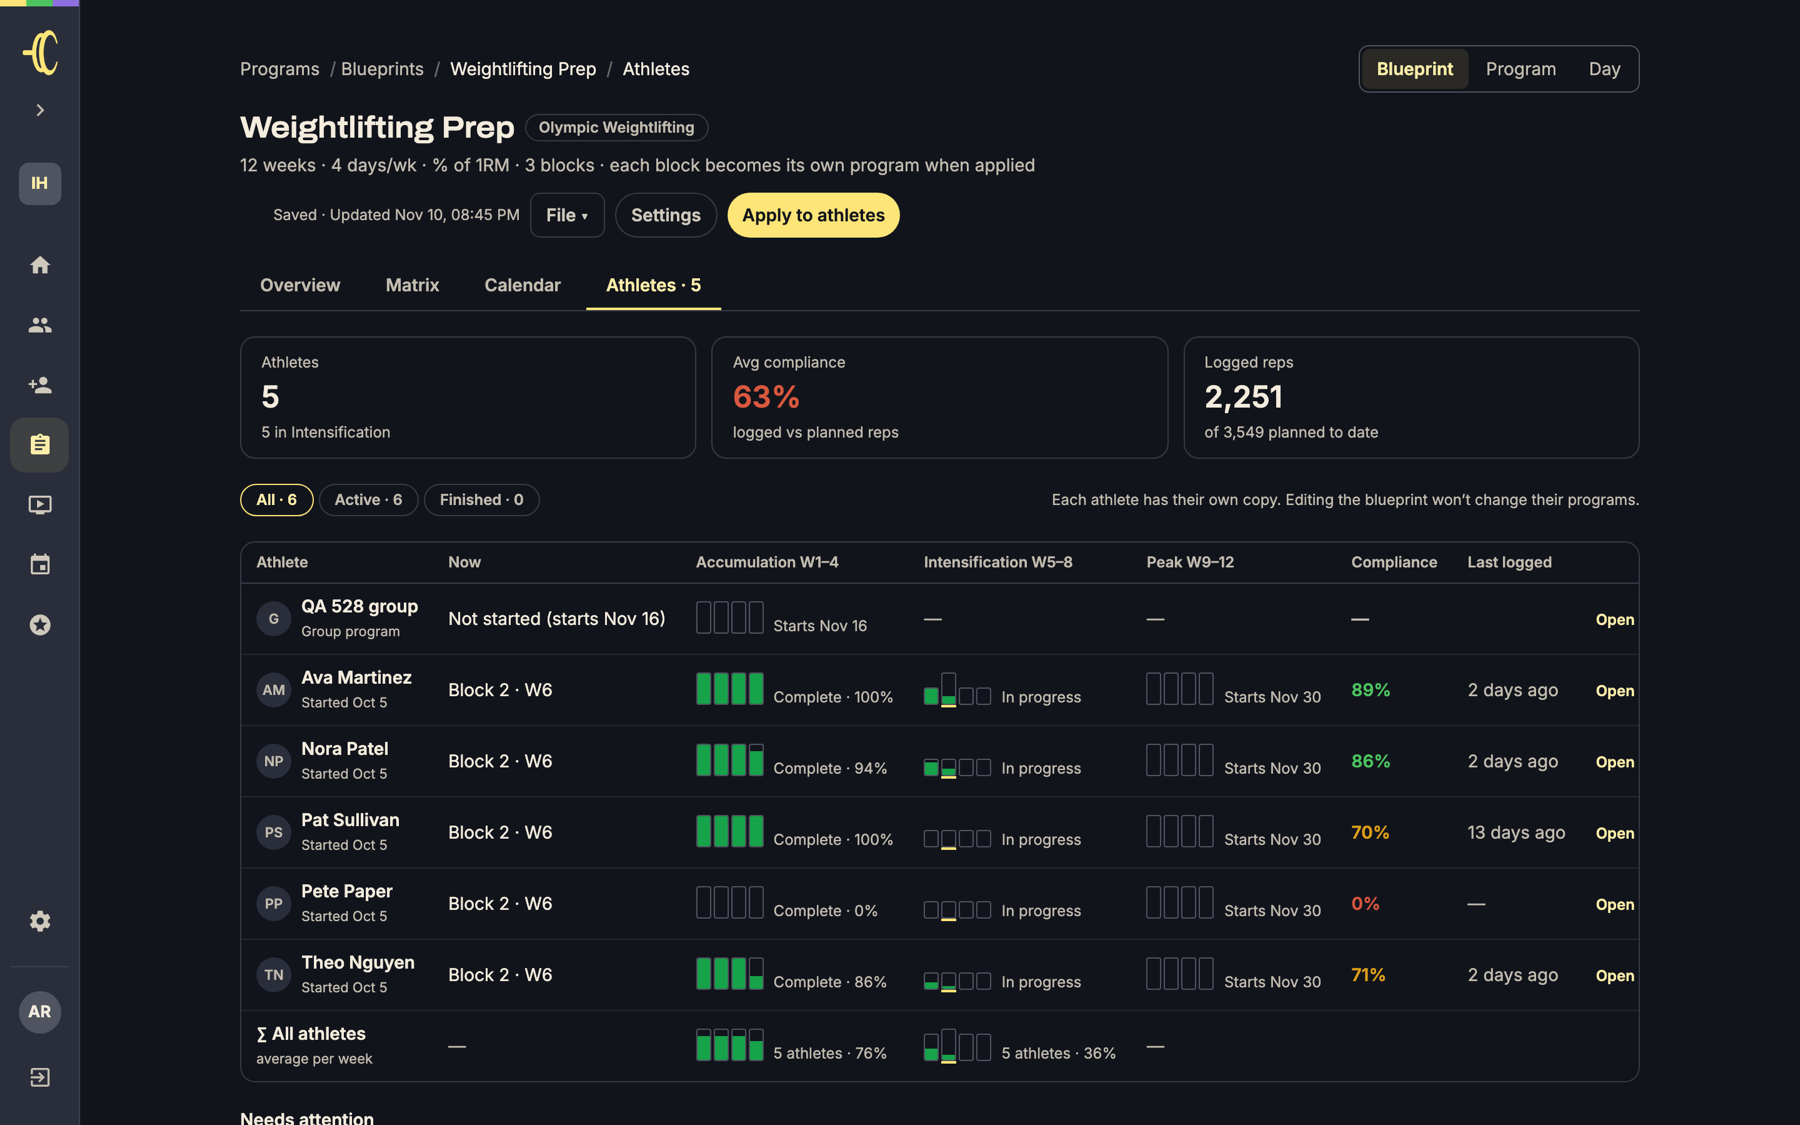
At the bottom, Needs attention flags things like missing maxes, athletes who've stopped logging, falling compliance, or a program that's drifted well above the blueprint.
When you open a program that came from a blueprint, a strip across the top shows where it sits in the bigger plan: the block, the current week, and who else is on the same week. Click Blueprint in the top-right switch to jump back to the blueprint.

Quick answers
- How do I rename or delete a blueprint? Use the File menu at the top of the blueprint. You'll also find Duplicate there.
- Can I change the sport or description? Yes, click Settings at the top of the blueprint.
- I updated the blueprint. Why didn't my athletes' programs change? Programs are copies. Apply the blueprint again with a new start date, or edit the athlete's program directly.
- Can I turn an existing program into a blueprint? Yes. Open the program and choose File → Save as blueprint.